In this guide, we will set up OpenVPN on an EC2 instance step by step. If you can launch an EC2 instance and SSH into it, you are good to go.
We will use a Debian Server because it is simple, stable, and widely used. The goal is to get a working VPN that you can connect to from your local machine and use to access private resources or route traffic securely.
Prerequisites for OpenVPN server
Before we start, make sure you have the following:
- An AWS account
- Basic knowledge of EC2 and SSH
- A local machine (Linux, macOS, or Windows)
- An SSH key pair downloaded on your machine
I am assuming you already know how to log in to AWS and navigate the EC2 console. Also, follow this guide below to prepare the VPC and networking.
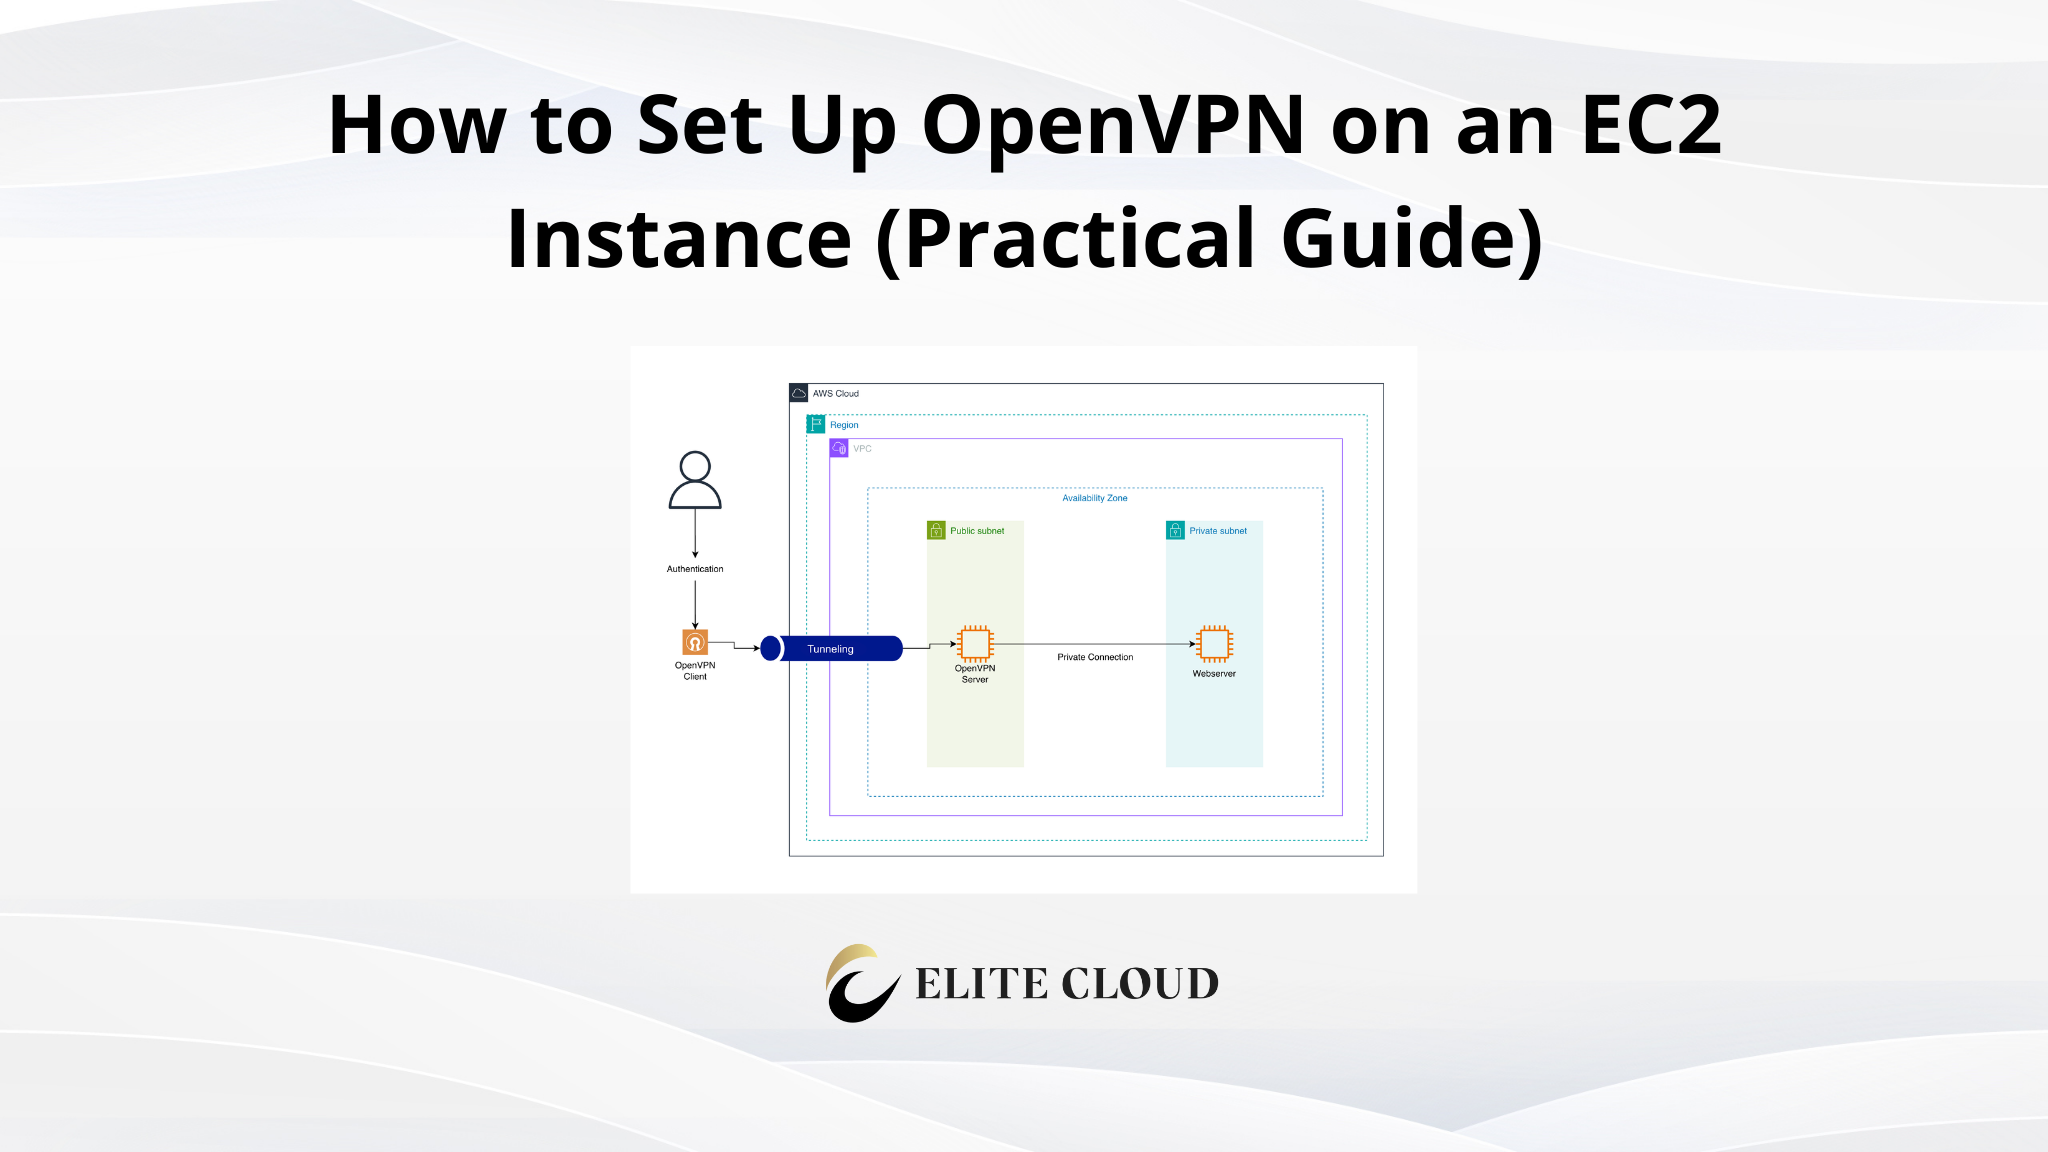
Architecture Overview for OpenVPN

The setup is simple:
- An EC2 instance runs OpenVPN
- Your local machine connects to the EC2 public IP
- OpenVPN creates a secure tunnel
- Traffic flows through the VPN tunnel
EC2 acts as your VPN server. Your laptop or desktop is the VPN client.
Launching the EC2 Instance for OpenVPN
For this demonstration, we need two instances. The first one is the OpenVPN server, and the second is the web server in the private subnet, which we will access via the VPN.
Now, create an EC2 instance with a Debian AMI. You can follow the guide below for creating an EC2 instance. Just make sure the AMI is Debian, the subnet is public, the instance is in the same AZ, and you have the SSH private key.
Now log in to your OpenVPN instance. Run the command to download the OpenVPN automation script.
curl -O https://raw.githubusercontent.com/angristan/openvpn-install/master/openvpn-install.sh
chmod +x openvpn-install.sh
You can go with manual installation, but this script automates it and has a good number of watchers. In a production environment, you should follow your company’s policy on running open-source automation scripts.

Now run the command sudo ./openvpn-install.sh interactive to start the script in interactive mode.
Here, keep entering the default recommended value unless you know what you are doing. The default values are safe and work for most use cases.

Once it asks for the client name, enter the name of the OpenVPN client. Add the validity of the client according to your needs. Also, select whether you want a passwordless client. For simplicity of demonstration, I will keep everything to the default.

On successful creation, you should see the OpenVPN client file in your user home directory.

Now use the command below to download the OpenVPN config.
scp -i "ec-aws-test.pem" \

[email protected]:/home/admin/OpenVPN-Server.ovpn \

.
Change the IP address to your instance’s IP address.

Now open UDP port 1194 in the EC2 security group for the OpenVPN Server.

If you dont know how to add security group inbound rules, I recommend you check the article below.
Now open sudo vim /etc/sysctl.conf and add the line net.ipv4.ip_forward=1. Also run the command sudo sysctl -p and sudo iptables -t nat -A POSTROUTING -s 10.8.0.0/24 -o ens5 -j MASQUERADE.

Restart the OpenVPN server using sudo systemctl restart openvpn-server@server.
Now download the OpenVPN client for your operating system from here. And upload the server configuration file you downloaded. If everything is done correctly, you should be successfully connected to the OpenVPN server.

And your IP address will change to the server’s IP address.

If you feel any lag or slow speed in your connection. You need to add these two lines
tun-mtu 1400

mssfix 1360
In your /etc/openvpn/server/server.conf and the client config file you downloaded, “OpenVPN-Server.ovpn”.
Now the OpenVPN instance is complete. You need to create the private instance. If you have followed the VPC article properly, you should also have a private instance with all the proper connections. Here, you just need to enable the port in the private instance security group.
Now connect to the VPN and log in to your private EC2 instance.

Then install the necessary packages and set up the web app. Now open the port in the security group. For my case, I will open port 80.

Save it and browse the private instance IP. And you can successfully browse the website privately using a secure tunnel.

Security Best Practices
- Restrict security group source IPs
- Rotate client certificates
- Disable password SSH login
- Use IAM roles and CloudWatch logs if this is production
Cleanup and Cost Considerations
If this is temporary:
- Stop or terminate the EC2 instance
- Delete unused Elastic IPs
A running EC2 costs money, even if you are not connected. Also, delete the NAT Gateway and its Elastic IP.
Conclusion
OpenVPN on EC2 is still a solid solution when you need full control over your VPN setup. For simpler use cases, AWS Client VPN might be easier, but when you want flexibility, OpenVPN gives you that control.