When you start working seriously with AWS, you realise something important sooner or later. The default VPC is fine for quick testing, but it hides too much. If you want real control, proper security, and architectures that actually scale, you need to build your own VPC from scratch.
In this guide, we will walk you through creating a VPC step by step. We will design public and private subnets, set up routing, attach an Internet Gateway, configure a NAT Gateway, and verify that everything behaves exactly the way it should.
What We Are Building and Why
Before touching the console, let’s be clear about the goal.
We are building:
- One custom VPC
- Public subnet for internet-facing resources
- Private subnet for internal resources
- Internet Gateway for inbound and outbound internet
- NAT Gateway for safe outbound internet from private subnets
- Proper route tables so traffic flows correctly
This setup is the foundation for most real-world AWS architectures, including web apps, APIs, VPN jump hosts, and backend services.
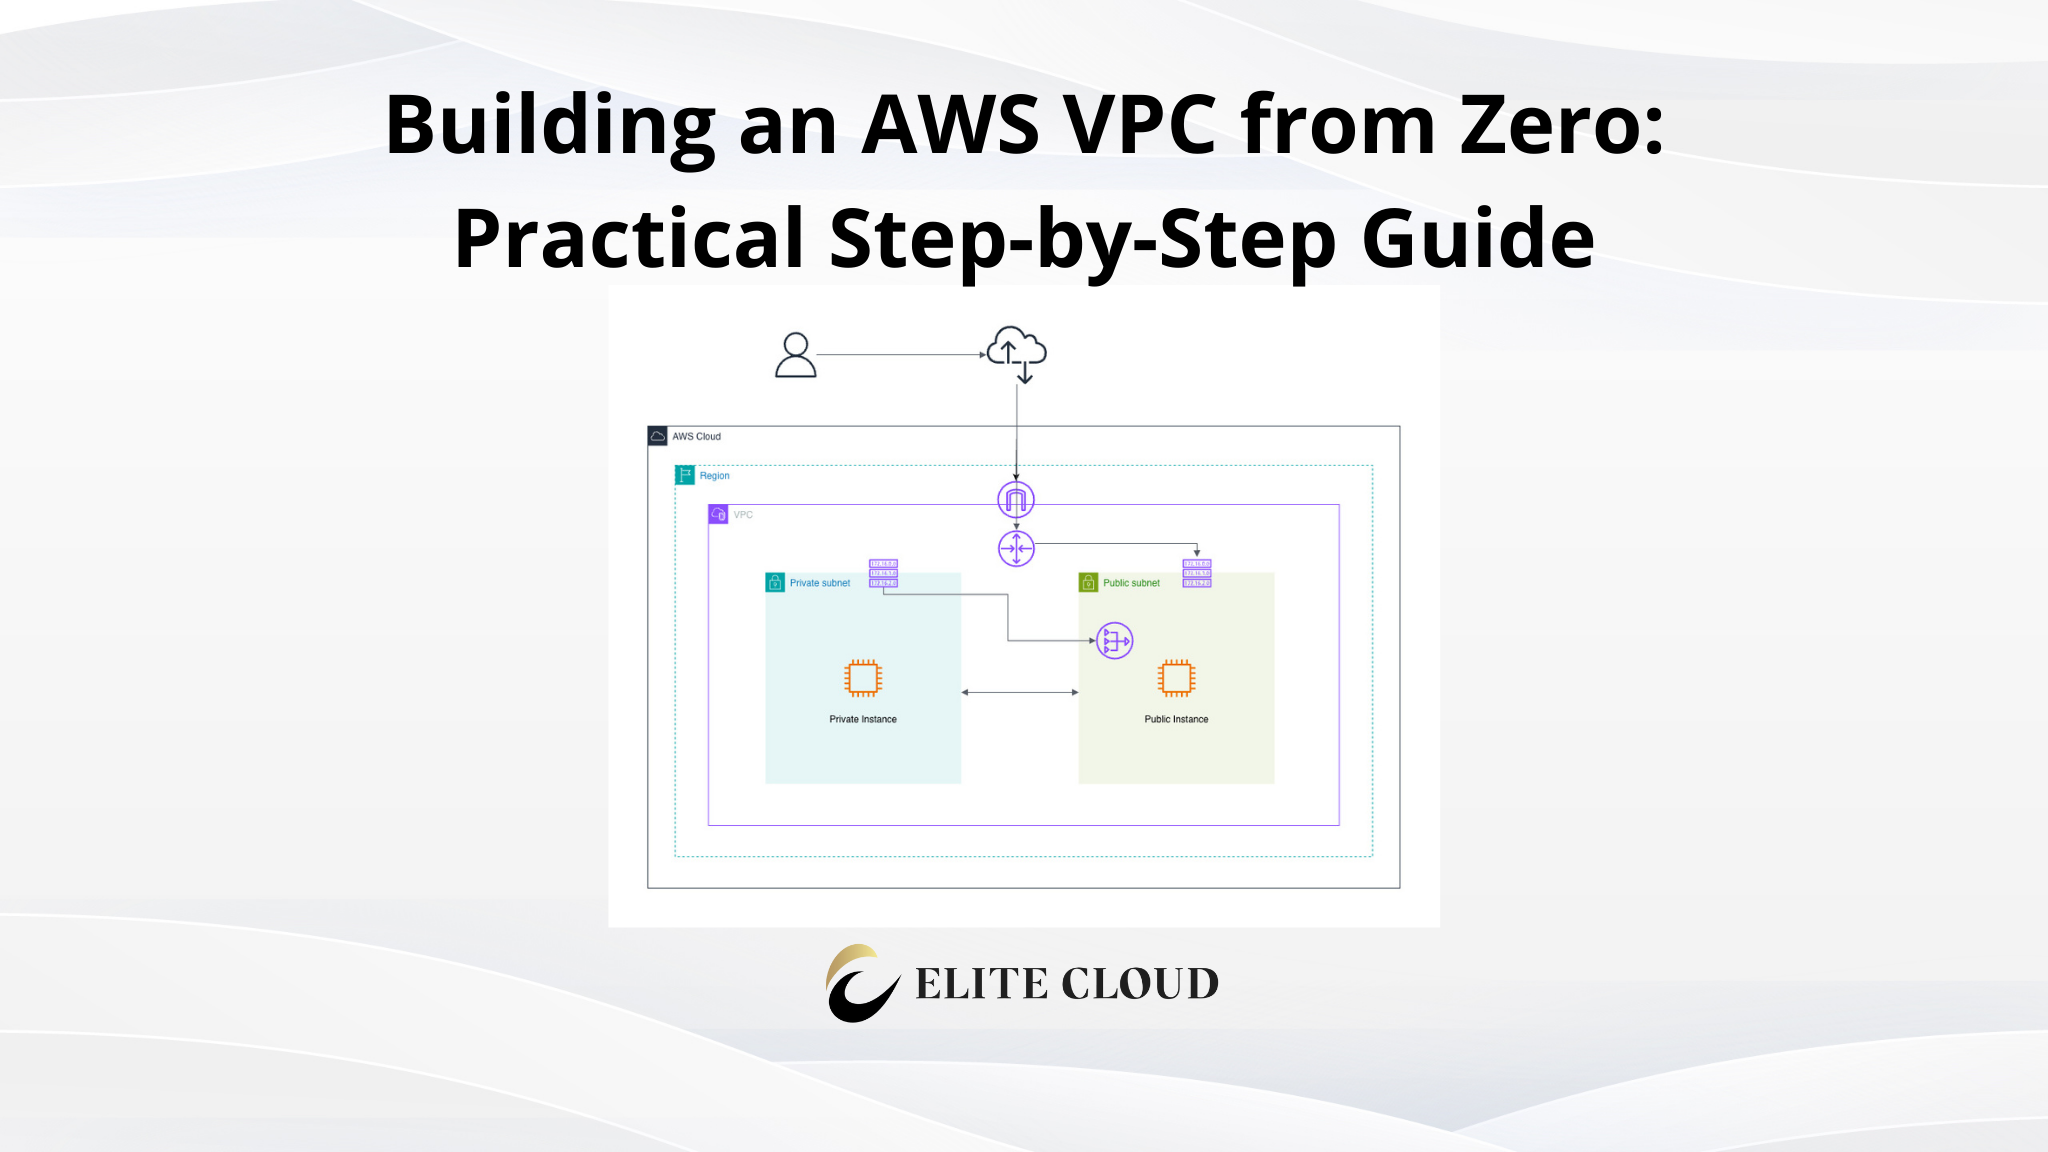
Architecture Overview

Think of it like this:
- Public subnet
Has a route to the Internet Gateway. Instances here can talk directly to the internet. - Private subnet
Has no direct route to the Internet Gateway. Outbound internet goes through a NAT Gateway. - Route tables
Decide where traffic goes.
Once you understand this flow, VPC networking becomes much easier.
Step 1: Creating the VPC
Go to VPC Console → Your VPCs → Create VPC.

Here, choose “VPC only”, and for the name tag, use “my-vpc-01”. In IPv4 CIDR block use “10.0.0.0/16”. Keep everything else at the default settings and click “Create VPC”.

If you are unsure about IP addresses, you can learn about CIDR notation. For this CIDR, we get to use the last two octets (10.0.X.X).
At this point, the VPC exists, but it cannot communicate to anything yet.
Step 2: Creating Subnets
Now we split the VPC into logical networks. Inside a VPC, there can be a public subnet and a private subnet. By default, 6 subnets are created in the default VPC.

Let’s create a public and private subnet according to the architecture.
Create a Public Subnet
Go to Subnets → Create subnet.

Now, from there, select the newly created VPC.

Name the public subnet “PublicSubnet” and choose “us-east-1a” for the Availability Zone. And for subnet CIDR, choose “10.0.1.0/24”. This gives us 256 IP addresses within the CIDR.
For simplicity, we are using the same Availability Zone. In production, you would usually create subnets across multiple AZs for high availability.
Now, click on “Add new subnet” to create the private subnet.

Create a Private Subnet
For the private subnet, name it “PrivateSubnet”, choose the same AZ, and set the subnet CIDR to “10.0.2.0/24”. Again, if you are unable to understand IP addressing, you need to learn about CIDR. But from a high level, we are actually cutting out two network “10.0.1.0/24” (256 IPs) and “10.0.2.0/24” (256 IPs) for our public and private subnet from the large pool of IP “10.0.0.0/16” (65,536 IP addresses).
Once done, click on “Create Subnet”.

At this stage, both subnets behave the same. They are neither public nor private yet. The difference comes from routing.
You can now create instances and assign them to a subnet. But the instances won’t be able to communicate with the internet. We will create instances after completing the networking setup.
Creating and Attaching an Internet Gateway
An Internet Gateway is what allows traffic between your VPC and the internet. To create one, go to: Internet Gateways → Create internet gateway.

Name the gateway “my-igw”, short for Internet Gateway. And click on “Create internet gateway”.

Now that the internet gateway has been created, you need to attach it to the VPC. You can only attach one IGW to a VPC. Click on “Actions → Attach to VPC”.

Choose the VPC, then click “Attach internet gateway”.

Now you can see the IGW is attached to our VPC.

But just because we added the Internet Gateway doesn’t mean the resources can communicate with the Internet. For that, we also need to add “Route Tables”.
Step 3: Creating Route Tables
Route tables define how traffic leaves a subnet.
Public Route Table
Go to: Route Tables → Create route table.

Name the route table “PublicRouteTable”, choose the VPC and click on “Create route table”.

Now we have to add IGW to the route table to make it public. Click on “Edit routes”.

Click on “Add route”,
- Destination: 0.0.0.0/0
- Target: Internet Gateway
- Select your IGW
- Save routes

This means all internet-bound traffic goes through the IGW.
Private Route Table
Create another route table, same as the previous one:
- Name: PrivateRouteTable
- VPC: same VPC

Do not add any internet route yet. Just leave it as it is.
Step 4: Associating Subnets with Route Tables
AWS uses subnet associations to decide routing. Here we have to associate the subnet with the route table we’ve just created.
Associate Public Subnet
- Click on PublicRouteTable
- Subnet associations → Edit subnet associations

- Select PublicSubnet
- Save associations

Associate Private Subnet
- Open PrivateRouteTable
- Subnet associations → Edit subnet associations

- Select PrivateSubnet
- Save associations

Now the public subnet has internet routing. The private subnet does not. Any instances or resources created on the public subnet can now communicate with the internet. But resources on the private subnet can communicate only on the local network. It cannot even download updates from the internet. For that, we have to add a NAT Gateway.
Step 5: Creating a NAT Gateway
Private subnets often require outbound internet access for updates, package installations, or external APIs. We use a NAT Gateway for that.
Note: NAT Gateway is billed per hour and per GB. For labs, this can become expensive if you forget to delete it.
Create NAT Gateway
Go to: NAT Gateways → Create NAT gateway.

Give a name, in “Availability mode” select “Zonal”, select the public subnet, connectivity type → public, allocate an elastic IP for the NAT Gateway, and click “Create NAT gateway”.

Note: A NAT Gateway must always be in a public subnet.
Step 6: Updating Private Route Table for NAT Access
Now we tell the private subnet how to reach the internet safely. Open “PrivateRouteTable” and click on “Edit routes”.

Now click “Add route,” choose the NAT Gateway we created, and set the destination to 0.0.0.0/0.

Save the changes.
Now, private instances can reach the internet, but the internet cannot reach them.
Step 7: Verifying Public and Private Subnet Behaviour
Now that everything is ready, we can create and test the VPC with EC2 instances. For that, we will first create a public instance in the public subnet, then create a private instance in the private subnet. Later, we will access the private instance from the public instance and try to reach out to the internet using the private instance.
Test Public Subnet
Launch an EC2 instance in the public subnet. Click on “Edit” in the network settings, select the custom VPC, and in the subnet select “PublicSubnet”. Enable auto-assign public IP. Create a Security Group and add “SSH” if it isn’t already.

If everything is done correctly, you can log in to the PublicInstance.

If you want to learn how to launch an EC2 instance from scratch, you can follow this guide.
Test Private Subnet
Same as the public instance, run the private instance but choose the private subnet, and disable Auto-assign public IP as we dont need it. In the security group, choose the source to VPC CIDR IP, 10.0.0.0/16. So it will be fully private.

Now, if you try to SSH into a private instance, it will not work because there’s no public IP address to connect to it. For that, transfer the SSH key to the public instance. You can do this using the command scp -i “ec-aws-test.pem” ec-aws-test.pem [email protected]:/home/ec2-user/. Make sure to change the filename and IP address.
Let’s connect to the private instance from the public instance using the command ssh -i “ec-aws-test.pem” [email protected]. The IP will be different for you. You can directly get the command from the “Connect” button.

You should now be able to log in.

And we can also access the internet from the private instance. This means everything is working as expected.

Cleanup and Cost Awareness
As stated earlier, NAT Gateways are not free. So delete the NAT Gateway by clicking Actions → Delete NAT gateway.

And also make sure to remove the elastic IP address from VPC → Elastic IPs → Actions → Release Elastic IP addresses.

Always clean up after testing.
Real-World Use Cases
This VPC layout is used for:
- Web applications with public ALB and private backend
- Bastion or VPN-based access models
- Secure API deployments
- Microservices running in private subnets
Once you master this, everything else in AWS networking builds on top of it.
Final Thoughts
If you understand how this VPC works, you are already ahead of many people using AWS daily.
We did not rely on defaults. We designed the traffic flow intentionally. That is the mindset AWS expects in real environments.