Amazon Simple Storage Service (S3) is a versatile and highly scalable cloud storage solution that has become a cornerstone of modern web hosting and data management. With robust infrastructure, unmatched durability, and flexible access control, AWS S3 allows users to store, manage, and distribute a wide range of data, from small doc files to massive archives.
Importance of Safe Hosting of Public Files in AWS S3
While AWS S3 offers a flexible platform for online data sharing, the importance of secure hosting cannot be overstated. Properly managing public files is crucial to prevent the exposure of sensitive information and maintain data integrity. This is not just a matter of safeguarding privacy, but also about complying with legal standards such as GDPR and HIPAA.
Data security breaches can have far-reaching consequences, from damaging a brand’s reputation to incurring heavy financial penalties. Secure hosting is also key to ensuring uninterrupted access to services, protecting against potential disruptions. Economically, it helps avoid unnecessary costs linked to data mismanagement and breaches.
Understanding AWS S3
Before getting into hosting files in S3 and configuring the security for public file access. It’s essential to understand its fundamental building blocks. These components form the basis of how S3 functions and how it’s used for restoring and managing data.
Bucket
In simple terms, a bucket in AWS S3 is a container for storing data similar to a top-level directory or folder on a traditional file system. However, unlike a directory on your local machine, an S3 bucket can store an immense amount of data. Each bucket you create has a globally unique name across all AWS accounts, serving as a primary namespace in S3. You can customize your bucket’s settings including access permissions, version control, and geographical location, to fit specific project needs.
Object
An Object is the fundamental entity stored in an S3 bucket. It represents any kind of data, such as a document, video, image, or event of an application. Each object in a bucket is identified and accessed by a key, which is essentially the object’s name or identifier. It also contains metadata like file type, size, etc.
Key
The key is a unique identifier for an object within a bucket. It’s similar to the file path in traditional file systems, providing a way to find and retrieve the object. The combination of a bucket, key, and optionally, a version ID (if versioning is enabled on the bucket) uniquely identifies each object. This structure allows S3 to effectively manage and retrieve vast amounts of data in an organized manner.
Getting started with S3
Before you get into creating S3 and it’s security. It’s mandatory to have an AWS account. You can follow this article here to learn how to create an AWS account. Once you’ve created your account navigate to S3 service either by searching or clicking on quick access links.

And don’t forget to specify the region of your choice (You can also do it on the setup page). But no matter which region you choose your bucket will be unique to global. Now click “Create bucket” from the Get Started page.

Creating S3 Bucket
This will take you to the setup page. In the “General configuration” section you need to give a “Bucket name” This name must be unique and it must also follow the naming rules that you can read from the “See rules for bucket naming” link.
Next, you’ve to select the “AWS Region” for the bucket. Your pre-selected region will be auto-selected by default. You can also copy settings from an existing bucket.

For the “Object Ownership” section you can enable and disable the ACLs. Disabling the ACLs means that only the account you use to create the S3 bucket will own the bucket and access to the bucket and its objects will be specified with only policy. Enabling ACLs will let other accounts own this bucket. Access to the bucket and its object can be specified using ACLs. Keep the default one as we’ll be using this account to control the S3 bucket.

The “Block Public Access settings for this bucket” section holds permission to allow your bucket to go public. By default the public access to the bucket is blocked. Continue with this, we’ll change this after creating this bucket.

Next, the “Bucket Versioning” section lets you enable bucket versioning. This feature lets you track the files you upload, and also recover the files that you accidentally deleted. This is similar to Git. Now enable it. Enabling this will prevent accidental overwrites and removal.

The “Tags” section lets you add identifier tags to your bucket. It’s better for organizing and doing other analyses. As it’s optional you can skip it.

The “Default encryption” section in Amazon S3 addresses a critical aspect of data security by automatically applying server-side encryption to new objects stored in your buckets. This ensures that your data is always protected, from the moment it is uploaded to S3.
Encryption Types
The default encryption offers several methods:
SSE-S3 (Server-Side Encryption with Amazon S3 Managed Keys): This is the standard encryption method where Amazon S3 uses AES-256, one of the strongest block ciphers available, to automatically encrypt objects.
SSE-KMS (Server-Side Encryption with AWS Key Management Service Keys): This option provides more control and an audit trail. You can opt for a customer-managed AWS KMS key or the default AWS-managed key (aws/s3). The audit trail is particularly beneficial for regulatory compliance and security monitoring.
DSSE-KMS (Dual-Layer Server-Side Encryption with AWS KMS Keys): Designed for highly regulated environments, this method applies two layers of encryption to objects, offering an extra level of security and compliance.
Bucket Key
S3 Bucket Key is a cost-effective and performance-enhancing feature for users who opt for Server-Side Encryption with AWS KMS. It allows for efficient key management while maintaining high-security standards, making it a valuable feature for managing encryption in large S3 buckets efficiently.

Keeping the default settings is recommended as choosing other options will lead to a complex setup. But you should consider using them depending on the data you store in S3. As the data we are going to store is going to be public the default SSE-S3 encryption will be more than enough.
In the “Advanced settings” section you can select the Object Lock feature that protects your objects from being deleted or overwritten for a fixed amount of time or indefinitely using the write-once-read-many (WORM) model.
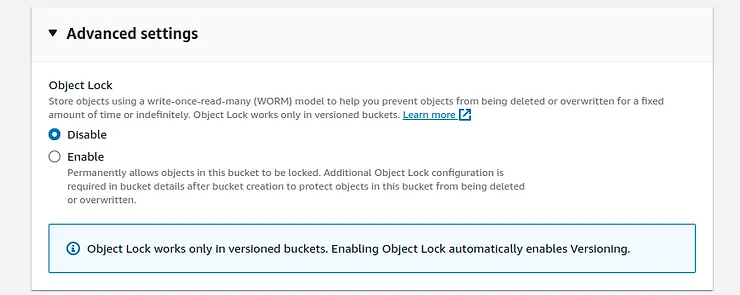
Keep it default and click on the “Create bucket” button.
This will create the bucket. Now you can store files and configure them to make them public.
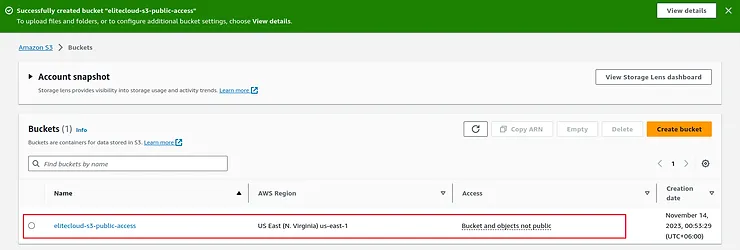
Now click on the bucket name and you will be taken inside the bucket. Inside the bucket, you can access multiple tabs with different utilities. Click on the “Upload” button to upload files.

We will upload one image, text, and a small archive file for testing. Clicking the Upload will take you to the upload page, you can either drag and drop files and folders or add them manually using the “Add files” and “Add folder” buttons. Let’s directly add the files.

You will be able to see the files you selected for upload in the “Files and folders” section. Now click on the “Upload” button to upload the files.
This will take some time and depending on your internet speed and file size this may take a while. You will be able to see the progress at the top status bar.

Once the upload is completed go to the destination URL.

This will take you inside the S3 bucket. Now click on any uploaded file and copy the URL.

Now open this URL in a new tab and you will see “AccessDenied” because the bucket is not public yet.

This is true for all the files you have uploaded. You can also access the file with a secret tokened URL. This is good for temporary public sharing.

This file can be accessed only by that given URL.

Now each of you might have different requirements. But for this example, we assume that a company needs a public bucket (all the objects will be public). Although there’s an IAM policy, bucket policy, encryption, etc to secure your file doing a human mistake can be brutal. That’s why it’s not recommended to keep private and confidential information with public information. Doing this increases the chance of making the confidential file public. Making a bucket public doesn’t mean it has to be writable, you should only give read access to the bucket’s files.
Enabling Public Access
Let’s make the entire bucket public. To do that get inside the bucket and navigate to the “Permissions” tab.

From there click on “Edit” from the “Block public access” section.

From there uncheck the box “Block all public access” and click “Save changes”.

This will give a pop-up, type “confirm” and enter.

Now we need to add a bucket policy. From “Bucket policy” click “Edit”.

Now click on the “Policy generator”. This will take you to a new page.

Inside the “AWS Policy Generator” page select the policy type to “S3 Bucket Policy”. Then in “Effect” select Allow, and for principle use the “*” (this will let everyone utilize the permission). And in Actions select “GetObject” (don’t mistake here).

Finally, copy your Amazon Resource Name (ARN) from the edit bucket policy page.

And past it in the Amazon Resource Name (ARN) field and click “Add Statement”.

You will see a statement will be generated. Now in Step 3 click on the “Generate Policy” button.

This will open up a window with json code. Copy the json code.
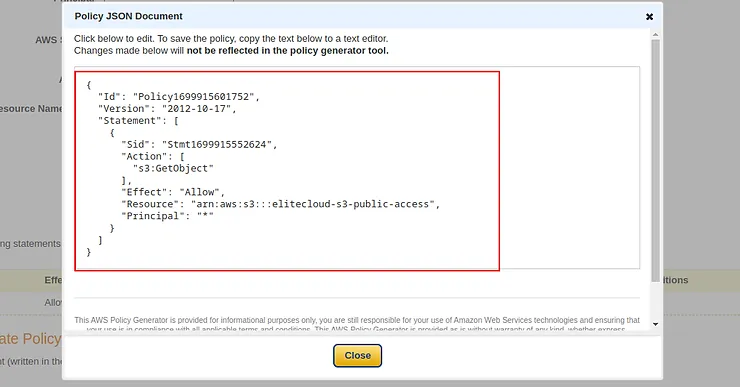
And paste it into the “Edit Bucket Policy Page” and now before you save it, in the resource field line 11 in my case “Resource”: “arn:aws:s3:::elitecloud-s3-public-access” add “/*” so it becomes “Resource”: “arn:aws:s3:::elitecloud-s3-public-access/*“.

Once done click on the “Save Changes” button. This will make the bucket objects public and only readable.
Now get back to the “Objects” tab select any file and copy the URL.

Open it in a new file you will see the image is successfully loaded.
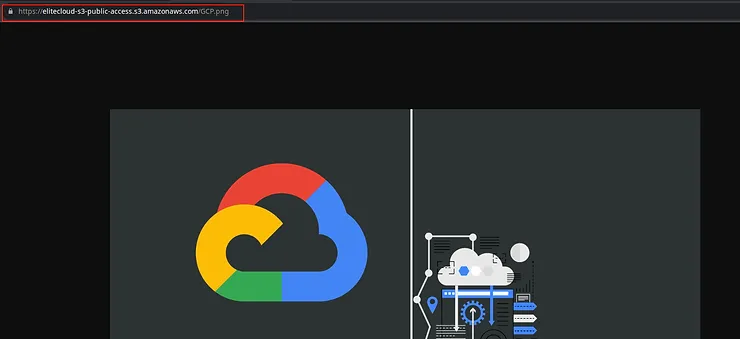
But this requires that you know the URL. You can configure it like a public share so that every file you upload will be automatically listed. And now if you upload any file it will be automatically accessible with the public URL.
We’ll be closing this article here. For more articles on AWS Cloud check out our resources section.
Conclusion
In summary, AWS S3 is a powerful and scalable cloud storage solution, essential for data management. However, the secure hosting of public files is crucial to protect sensitive information and comply with legal standards.
📦 Need a reliable and scalable solution for storing your data?
Elite Cloud can help you design, secure, and optimize your Amazon S3 storage—whether it’s for backups, static websites, media content, or big data.
👉 Schedule a call with the Elite Cloud team today and unlock the full potential of Amazon S3 for your business needs!

